Formulario de contactos para Blogger V2
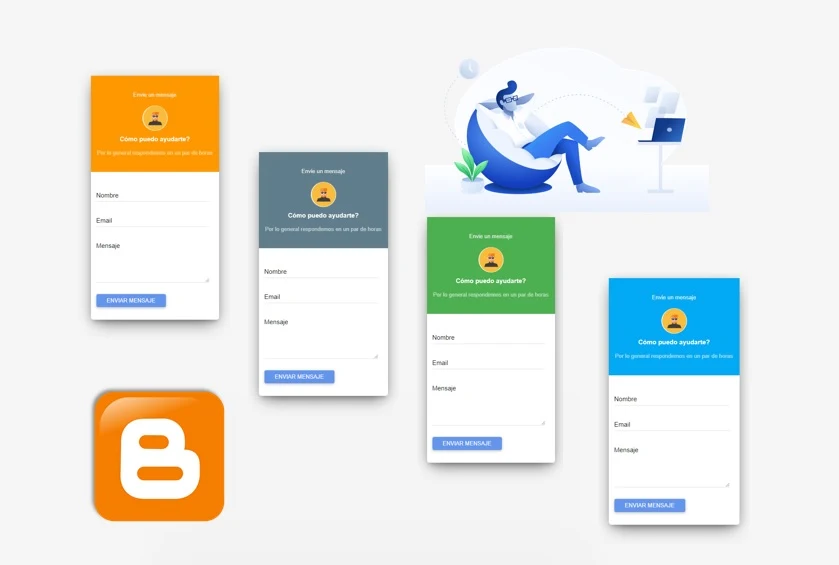 Aprende a rediseñar el Formulario de contactos de Blogger con unos simples pasos, en tan solo un minuto tendrás un nuevo diseño de Formulario de contactos en tu blog de Blogger.
A continuación puede ver su demostración en el siguiente blog de demos
Empezamos
Video tutorial
1.- Abrir Blogger.com
2.- Un clic en Diseño
3.- Un clic en Añadir un gadget
4.- Un clic en el Gadget Formulario de contacto
5.- Un clic en Tema
6.- Un clic en Editar HTML
7.- Busque el gadget ContactForm1
8.- Le mostrara lo siguiente como ejemplo:
9.- Elimine todo el código seleccionado del Formulario de contacto y remplazalo por el siguiente código:
<b:widget id='ContactForm1' locked='false' title='Formulario de contacto' type='ContactForm' version='1'>10.- ¿Cómo cambiar el color del formulario de contactos?
<b:includable id='main'> <b:if cond='data:title != ""'> </b:if>
<div class='contact-form-widget card card-signup'>
<div class='header-adb deep-purple text-center'>
<p class='c-1'>Envíe un mensaje</p>
<img alt='Avatar' class='avatar' src='https://blogger.googleusercontent.com/img/b/R29vZ2xl/AVvXsEgoxEVqG-5yyNFGaoydlbbMR3Y1f3Qgax2zAj74JFUeZkFB4K53rCioIUjQqVvM4DOwGP-JolRT9sVtiyHyRljAQc46w7LgEkGou8RUKaGkvRbY9dYCtQ0578EWwujdkkdTOkq1luUPC1s/s1600/perfil.jpg'/>
<h4 class='card-title'>Cómo puedo ayudarte?</h4>
<p class='c-2'>Por lo general respondemos en un par de horas</p>
</div>
<div class='form'>
<form name='contact-form'>
<div class='ayudadebloggerinput'>
<input class='validate' id='ContactForm1_contact-form-name' name='name' required='' type='text' value=''/>
<span class='highlight'/>
<span class='bar'/>
<label>Nombre</label>
</div>
<div class='ayudadebloggerinput'>
<input class='validate' id='ContactForm1_contact-form-email' name='email' required='' type='email' value=''/>
<span class='highlight'/>
<span class='bar'/>
<label>Email</label>
</div>
<div class='ayudadebloggerinput'>
<textarea class='validate' cols='25' id='ContactForm1_contact-form-email-message' name='email-message' required='' rows='5'/>
<span class='highlight'/>
<span class='bar'/>
<label>Mensaje</label>
</div>
<input id='ContactForm1_contact-form-submit' type='button' value='Enviar mensaje'/>
<div id='ContactForm1_contact-form-error-message'>
</div>
<div id='ContactForm1_contact-form-success-message'>
</div>
</form>
</div>
<style>
.ayudadebloggerinput {
float: none;
position: relative;
margin-bottom: 22px;
margin-right: 10px
}
.ayudadebloggerinput input,.ayudadebloggerinput textarea {
font-size: 15px;
padding: 10px 0;
display: block;
width: 100%;
border: none;
border-bottom: 1px solid #ddd
}
.ayudadebloggerinput input:focus,.ayudadebloggerinput textarea:focus {
outline: none
}
.ayudadebloggerinput label {
color: #111;
font-size: 15px;
font-weight: 400;
position: absolute;
pointer-events: none;
left: 0;
top: 10px;
transition: .2s ease all
}
.bar {
position: relative;
display: block;
width: 100%
}
.bar:before,.bar:after {
content: '
'
;
height: 2px;
width: 0;
bottom: 1px;
position: absolute;
background: #e91e63;
transition: .2s ease all
}
.bar:before {
left: 50%
}
.bar:after {
right: 50%
}
.ayudadebloggerinput input:focus ~ .bar:before,.ayudadebloggerinput input:focus ~ .bar:after,.ayudadebloggerinput textarea:focus ~ .bar:before,.ayudadebloggerinput textarea:focus ~ .bar:after {
width: 50%
}
.highlight {
position: absolute;
height: 50%;
width: 100px;
top: 25%;
left: 0;
pointer-events: none;
opacity: .5
}
.ayudadebloggerinput input:focus ~ .highlight,.ayudadebloggerinput textarea:focus ~ .highlight {
animation: inputHighlighter .3s ease
}
.ayudadebloggerinput input:focus ~ label,.ayudadebloggerinput input:valid ~ label,.ayudadebloggerinput textarea:focus ~ label,.ayudadebloggerinput textarea:valid ~ label {
top: -20px;
font-size: 12px;
color: #888;
}
input#ContactForm1_contact-form-email-message {
height: 150px
}
input#ContactForm1_contact-form-submit {
color: #fff!important;
background: cornflowerblue;
padding: 15px 25px;
border-radius: 4px;
border: none;
outline: none;
box-shadow: 0 2px 5px 0 rgba(0, 0, 0, 0.16), 0 2px 10px 0 rgba(0, 0, 0, 0.12);
cursor: pointer;
transition: all .4s ease-in-out;
text-transform: uppercase;
float: left;
margin-top: 5px;
line-height: 1px;
}
input#ContactForm1_contact-form-submit:hover {
box-shadow: 0 8px 17px 0 rgba(0, 0, 0, 0.2), 0 6px 20px 0 rgba(0, 0, 0, 0.19)
}
#ContactForm1_contact-form-error-message {
float: right;
background: #D32F2F;
color: #fff;
font-size: 13px;
font-weight: 700;
border-radius: 3px
}
#ContactForm1_contact-form-success-message {
float: right;
background: #4CAF50;
color: #fff;
font-size: 13px;
font-weight: 700;
border-radius: 3px
}
.contact-form-widget {
height: 320;
margin-left: 0;
max-width: 100%;
padding: 0px 0px 30px;
padding-top: 0;
width: 100%;
}
form {
padding: 8px 13px 8px 13px;
}
.card {
display: inline-block;
position: relative;
width: 100%;
margin-bottom: 30px;
border-radius: 6px;
color: rgba(0, 0, 0, 0.87);
background: #fff;
box-shadow: 0 16px 38px -12px rgba(0, 0, 0, 0.56), 0 4px 25px 0px rgba(0, 0, 0, 0.12), 0 8px 10px -5px rgba(0, 0, 0, 0.2);
}
.card-signup .header-adb {
padding: 20px 6px;
}
.card [class*="header-"],.card [class*="content-"] {
color: #FFFFFF;
}
.card .header-primary,.card .content-primary {
background: linear-gradient(60deg, #ab47bc, #7b1fa2);
}
.card .header-adb {
margin-bottom: 25px;
}
.text-center {
text-align: center;
}
.card-title {
color: #FFFFFF;
font-weight: 700;
font-size: 15px;
line-height: 0;
}
.c-1 {
color: #f1f1f1;
}
.c-2 {
color: #fff;
opacity: 0.65;
}
.avatar {
vertical-align: middle;
width: 60px;
height: 60px;
border-radius: 50%;
}
.red {
background-color: #f44336 !important;
}
.pink {
background-color: #e91e63 !important;
}
.purple {
background-color: #9c27b0 !important;
}
.deep-purple {
background-color: #673ab7 !important;
}
.indigo {
background-color: #3f51b5 !important;
}
.blue {
background-color: #2196f3 !important;
}
.light-blue {
background-color: #03a9f4 !important;
}
.cyan {
background-color: #00bcd4 !important;
}
.teal {
background-color: #009688 !important;
}
.green {
background-color: #4caf50 !important;
}
.light-green {
background-color: #8bc34a !important;
}
.lime {
background-color: #cddc39 !important;
}
.yellow {
background-color: #ffeb3b !important;
}
.amber {
background-color: #ffc107 !important;
}
.orange {
background-color: #ff9800 !important;
}
.deep-orange {
background-color: #ff5722 !important;
}
.brown {
background-color: #795548 !important;
}
.grey {
background-color: #9e9e9e !important;
}
.grey-darken-4 {
background-color: #212121 !important;
}
.black {
background-color: #000000 !important;
}
.blue-grey {
background-color: #607d8b !important;
}
</style> </div> </b:includable>
</b:widget>
Busque la siguiente línea de código:
<div class='header-adb deep-purple text-center'>
Elimine el código que esta marcado de color negro deep-purple y remplacelo por cualquiera de los siguientes nombres:
- red
- pink
- purple
- deep-purple
- indigo
- blue
- light-blue
- cyan
- teal
- green
- light-green
- lime
- yellow
- amber
- orange
- deep-orange
- brown
- grey
- grey-darken-4
- black
- blue-grey
11.- Puede cambiar las palabras que están marcadas de color negro
<p class='c-1'>Envíe un mensaje</p>
<img alt='Avatar' class='avatar' src='https://blogger.googleusercontent.com/img/b/R29vZ2xl/AVvXsEgoxEVqG-5yyNFGaoydlbbMR3Y1f3Qgax2zAj74JFUeZkFB4K53rCioIUjQqVvM4DOwGP-JolRT9sVtiyHyRljAQc46w7LgEkGou8RUKaGkvRbY9dYCtQ0578EWwujdkkdTOkq1luUPC1s/s1600/perfil.jpg'/>
<h4 class='card-title'>Cómo puedo ayudarte?</h4>
<p class='c-2'>Por lo general respondemos en un par de horas</p>
12.- Es momento de guardar los nuevos cambios, un clic en Guardar plantilla
Ahora visite su blog y mire como funciona el nuevo formulario de contactos en su blog de Blogger
Fácil verdad!
¿Necesitas ayuda?
Cualquier pregunta no dude en escribir
Recuerda suscribirte:
Obtenga nuestro boletín de noticias diario | Suscríbete gratuitamente SUSCRIBIRSE
Solo quería decir algo por si le ocurre el mismo problema a otra persona. Al final del codigo eliminen cuando cierra el b widget porque si no da error
ResponderEliminarCómo cambio la foto que sale ahí?
ResponderEliminarHola Octa, con respecto a su pregunta debe cambiar la url que dice: https://blogger.googleusercontent.com/img/b/R29vZ2xl/AVvXsEgoxEVqG-5yyNFGaoydlbbMR3Y1f3Qgax2zAj74JFUeZkFB4K53rCioIUjQqVvM4DOwGP-JolRT9sVtiyHyRljAQc46w7LgEkGou8RUKaGkvRbY9dYCtQ0578EWwujdkkdTOkq1luUPC1s/s1600/perfil.jpg
Eliminar